|
|
| |
 |
Anesthetize
the implant site. Infiltration anesthesia
under mucogingival junction with 1/2
ample (1:100,000 2% lidocane) is enough. |
|
|
 |
Scrub
the implant site with H₂O₂and dry
with air.Drying
the implant site will make the next
step easier. |
|
|
 |
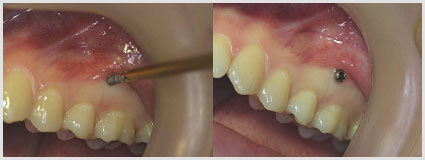
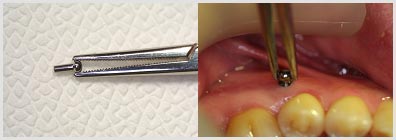
Mark
the expected root form on keratinized
gingiva with explorer. The root form
is imagined in the panoramic X-ray.
|
|
|
 |
|
 |
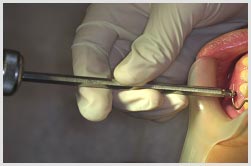
Drill
to the appropriate depth using a low-speed
handpiece under copious irrigation
with an isotonic saline solution.
A drill speed of 1,000~1,500rpm and
pressure of 10~15Ncm produce the best
results. The 1.5mm-diameter guide
drill is especially helpful when drilling
through cortical bone( Leibinger Co.
1.5mm-diameter REF 01-08195 ). We
feel the penetration sensation of
drill when the drill perforates the
cortical bone and we can see the bleeding
as a result of penetration of drill
to the cancellous bone. Drill to cortical
bone depth only, not to cancellous
bone . Drilling to cancellous bone
can damage the root. |
|
|
 |
|
 |
Remove
the colored-coded cap from the sterile
Cimplant package and then place the
Cimplant body into the screw holder. |
|
|
 |
|
 |
Assemble
the Cimplant body to the screw driver.
Axis of screw driver and axis of Cimplant
body form a
straight line. |
|
|
 |
|
 |
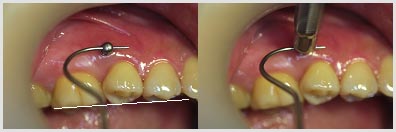
Screw
the body of the Cimplant clockwise
into the prepared site. Screw until
the top of Cimplant body is equal
to gingival surface. You feel tightness
in the final stage of screwing. This
is normal. |
|
|
 |
|
 |
Assemble
the head into the Cimplant body using
the appropriate instrument either
immediately after implantation or
1-2 weeks later.
|
| |
The method to
assemble the head is as follows :
Hold the head with hemostat and then
insert the head into the Cimplant
body inner hole. Insert the tip of
explorer into the tube of the head
and then rotate it with explorer to
be parallel to the occlusal plane.
Assemble the head part of Cimplant
into the Cimplant body by lightly
tapping with a small mallet 1 to 2
times. It helps
to usea
mirror holder to translate
the mallet force to the head. Immediate
loading is possible in areas of dense
bone where stability is assured. However,
the stability of the Cimplant should
be confirmed four weeks after placement. |
|
|
 |
|
 |
|
 |
|
| |
|
| |
|
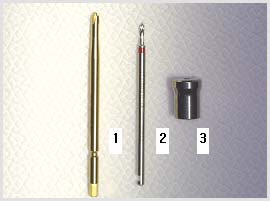
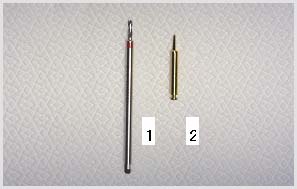
Instruments
which need to be sterilized |
① screw driver tip
② drill
③ Cimplant holder |
|
|
 |
|
|
|
Types
of drill
|
①
Long drill for low speed straight
hand piece
② Short drill for low speed contra-angle
hand piece
If we use a smaller-diameter drill,
it makes a smaller hole in the alveolar
bone. This may
cause the Cimplant body to slip and
the insertion of Cimplant body into
the drilled hole more difficult.
It is recommended to use the drill
with correct size of diameter (1.5mm) |
|
|
|
 |
|
|
The
main implantation site for Cimplant
is the interdental space between the
second premolar and first molar. If
the interdental space of this area
is too narrow or the alveolar bone
is not enough due to extension of
maxillary sinus, it should not be
implanted. The
next choice for the interdental space
would be between the first molar and
second molar. |
|
|
 |
|
|
| |
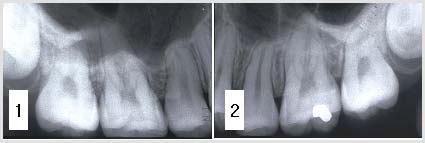
Fig.1
The interdental space between the
second premolar and first molar is
sufficient.
But too much apically positioned implantation
may invade maxillary sinus and it
is the cause of exfoliation.
Fig.2
The interdental space between the
second premolar and first molar
is not enough but the interdental
space between the first molar and
second molar is enough. In this
case, the interdental space between
the first molar and second molar
is the implantation site.
|
|
|
 |
|
|
| |
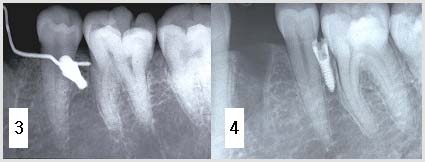
Fig.3
The interdental space between the
second premolar and first molar is
enough and Cimplant is implanted
horizontally.
Fig.4
The interdental space between the
second premolar and first molar
is not enough. Therefore
theCimplant was vertically
inclined. This
doesn’t damage the periodontal ligament
directly, but too close of
an implantation to the periodontal
ligament may be
the cause of early exfoliation
|
|
|
|
|
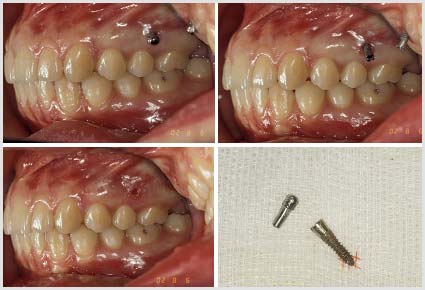
Removal
of Cimplant |
| Anesthetize
the implant site topically. Then
disassemble the head from the Cimplant
body using a How plier (counter-clockwise
rotates the Cimplant body using a
screw drive). If it is hard to remove
the Cimplant body using a screw driver,
an orthodontic heavy wire plier can
be used. Soft tissue is healed within
a few days. |
|
|
 |
|
|
|
When
early exfoliation occurs, re-implant
Cimplant. |
| Mobility
of Cimplant in 1 to 3 weeks after
implantation means failure of implantation.
In this situation, Cimplant should
be removed and removal of Cimplant
is usually done with head in Cimplant
body. Removed Cimplant can be reused
in the same patient. |
| |
The
method to reuse is as follows
: Separate the head from the
Cimplant body and clean the removed
Cimplant surface with water-spray.
Sandblast(s)
the Cimplant surface. Autoclave(s)
the Cimplant and reuse it. If assembling
the screw driver to Cimplant body
in Cimplant holder is difficult due
to loosening of binding, slightly
squeeze the notch of Cimplant neck
and try to assemble
again. However, strongly squeezing
the Cimplant may crush the neck structure.
|
|